карбованец

  • Mining "Karbo"

    After you have installed the Wallet "Karbo" and you have a personal account, you can proceed to the mining of the "Karbo" crypto currency.

    This crypto currency has a CriptoNight algorithm, which is optimized to run on not only GPU/graphics processors (graphics cards), but also CPU/conventional processors. This allows the production of "Karbo" by means of an ordinary home computer without the need to collect expensive powerful farms.

    There are several options for the extraction of "Karbo":
    1. In the native application in the "Mining Minor" mode and in the "Mining in the Pool" mode;
    2. Mining in the pool with the help of specialized programs.

    Specialized programs for mining allow you to use the video card to work, and on ordinary processors, the efficiency of mining can increase by 50-100% than in its native application.

    You can see the approximate results on the speed of production on different processors and video cards here and here.

    At the current speed of calculations in the Karbo network, the effectiveness of mining in the "solo" mode tends to zero even if you have a very powerful computer. Therefore, we do not even consider this option.

    Consider "mining in the pool".

    Mining in a pool means that one block is processed simultaneously by several computers. At the same time, if the block is successfully unblocked, the entire prize is divided evenly between the participants. It is worth noting that although the revenue is divided among all, but still this kind of production is more productive and in the end brings more benefits.

    1. Mining in the pool using the native application

    We launch the Wallet "Karbo"  and in the menu on the left we find the "Mining" item.
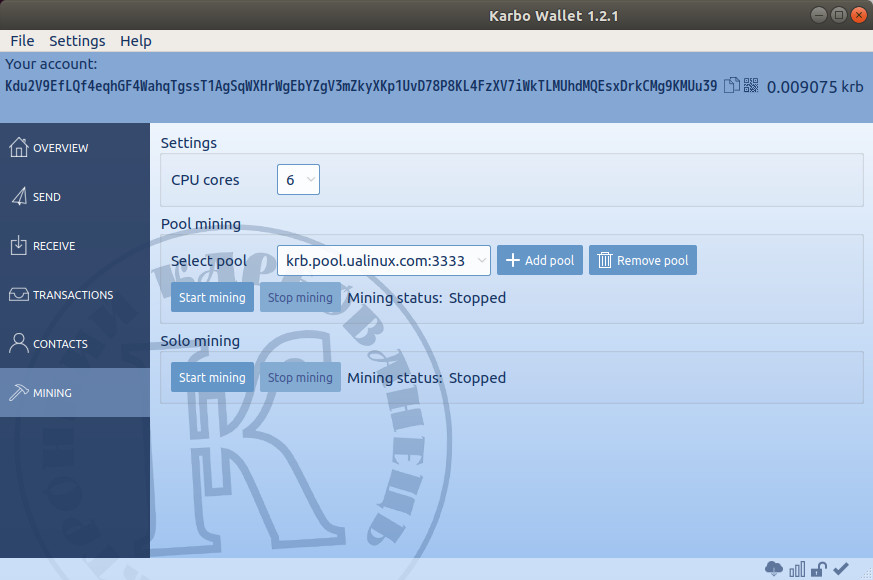
    Here you can select the number of CPU cores that will be occupied by the prey.
    You should pay attention to the number of cores to choose.At a minimum, do not load your computer into one core.For example, you can include a six-core on the mining only on 4-5 cores, etc.This will prevent your notebook processor from overheating.

    Finding the number of cores is not difficult and manual.Change the number of cores, run the mining and look at the hashtrack.The higher this figure, the better.It shows how many operations per second (hashes per second) your computer can do.

    In addition, you need to "select a pool" (by default, "krb.pool.ualinux.com" is installed). If you do not have it installed, we recommend adding it ("Add pool") and installing it by default.
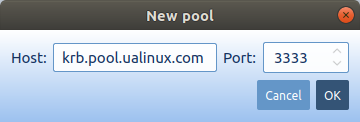

    After that, you can click the "Start Mining" button in the "Mining in the Pool" section.

    2. Mining in the pool with the help of specialized programs

    As mentioned above, the use of specialized programs for mining allows to increase the efficiency by 50-200% using only the processor, and also to use also video cards, which the native client does not allow.

    Such a client usually runs through the terminal and the result of its work looks something like this:
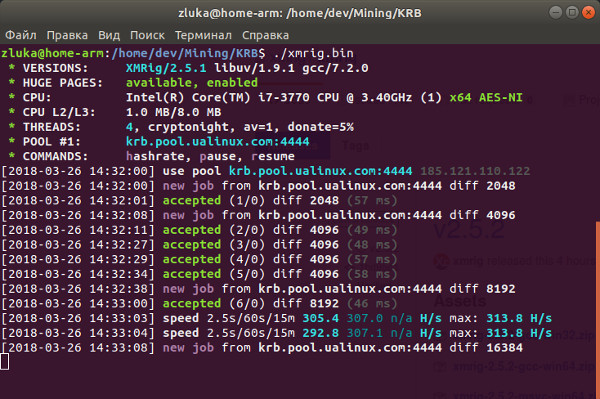

    2.1 Mining on the CPU (s)

    For Mining on processors, we recommend the XMRig program.

    config.json - configuration example for XMRig
    {
        "algo": "cryptonight",
        "av": 0,
        "background": false,
        "colors": true,
        "cpu-affinity": null,
        "cpu-priority": null,
        "donate-level": 1,
        "log-file": null,
        "max-cpu-usage": 100,
        "print-time": 60,
        "retries": 5,
        "retry-pause": 5,
        "safe": false,
        "syslog": false,
        "threads": null,
        "pools": [
            {
                "url": "krb.pool.ualinux.com:3333", // port 3333 can be changed according to the table
                "user": "YOUR_WALLET",           // it is necessary to put your wallet number
                "pass": "x",
                "keepalive": true,
                "nicehash": false,
                "variant": -1
            }
        ],
        "api": {
            "port": 0,
            "access-token": null,
            "worker-id": null
        }
    }

    2.2 Mining on the GPU (video cards nVidia and AMD)

    There are two types of programs that we can recommend to you.
    It is worth noting that the programs specified in clauses 2.2.1 and 2.2.2 are already available as ready-made executable files for the Windows platform, and for the Linux platform they must be compiled themselves.
    But the effectiveness of the result on Linux is higher, due to the fact that you are compiling the program specifically for your system.

    2.2.1 Separately for each type of video cardXMRig-nVidia and XMRig-AMD.

    The configuration file for both is almost the same

    config.json - configuration example for XMRig nVidia/AMD
    {
        "algo": "cryptonight",
        "background": false,
        "colors": true,
        "donate-level": 1,
        "log-file": null,
        "print-time": 60,
        "retries": 5,
        "retry-pause": 5,
        "syslog": false,
        "opencl-platform": 0, // the line must be removed for nVidia cards
        "threads": null,
        "pools": [
            {
                "url": "krb.pool.ualinux.com:5555", // port 5555 can be changed according to the table
                "user": "YOUR_WALLET",           // it is necessary to put your wallet number
                "pass": "x",
                "keepalive": true,
                "nicehash": false,
                "variant": -1
            }
        ],
        "api": {
            "port": 0,
            "access-token": null,
            "worker-id": null
        }
    }

    2.2.2 Complex approachXMR-Stak (processors and video cards nVidia and AMD are involved in one program).

    This program at the very first determines your processors and video cards and by its response to non-complex questions itself creates its own configuration file for operation.


    A full list of specialized programs for mining is available here.
    Maybe you'll like more of another program or another will show more performance on your computer.

    For greater efficiency of the program, it is necessary for the system to work with large pages in memory. This can increase productivity by 20-40%.

    big_pages.sh - script for Linux opening large pages
    #!/bin/bash
    script=`basename "$0"`
    HPS=`grep Hugepagesize /proc/meminfo | awk -F" " {'print $2'}`
    NC=`grep -c processor /proc/cpuinfo`
    NHP=$(($(($NC*2200/$HPS))+1))
    case $@ in
     enable)
      echo $NHP > /proc/sys/vm/nr_hugepages
      ulimit -l $(($NHP * $HPS))
      echo "Huge pages enabled"
      ;;
     disable)
      echo 0 > /proc/sys/vm/nr_hugepages
      echo "Huge pages disabled"
      ;;
     *)
      echo -e "Usage: \n$script enable - Enabling Huge Pages\n$script disable - Disabling Huge Pages"
      ;;
    esac

    Also you can download this script for Linux, which opens large pages.

    In MS Windows, this problem also exists. It is expressed by the inscription "MEMORY ALLOC FAILED: VirtualAlloc failed." in the terminal, at the start of the miner.
    Even if you do not see this inscription, it is still better to give access to large pages of memory for greater productivity.

    How to open large memory pages in Windows
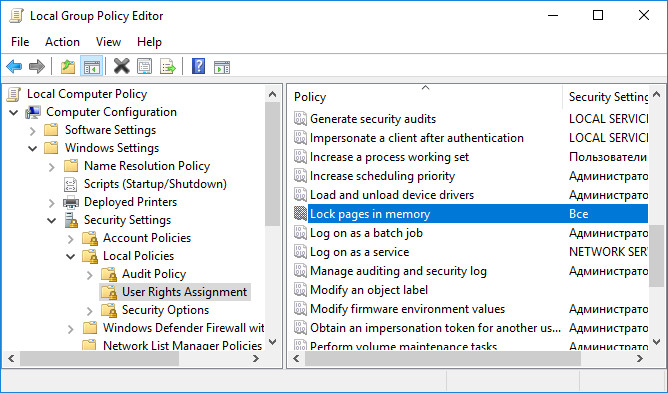
    Run the gpedit.msc command from the command line as an administrator.
    Next, go "Computer Configuration" -> "Windows Settings" -> "Security Settings" -> "Local Policies" -> "User Rights" Assignment".
    The list of policies appears to the right. We need "Lock pages in memory" - open.
    Press the button "Add User or Group" - - write "All" without quotes, then click "Check Names", then "OK".
    After that, you need to restart the computer. 
    Also for those who will mining the Karbo on MS Windows, you must install the Microsoft Visual C++ 2015 library

    P.S. A recommendation for those who try mining the first time - make sure that the processor and video card do not overheat.
    This usually means that the temperature should not exceed 80 degrees.


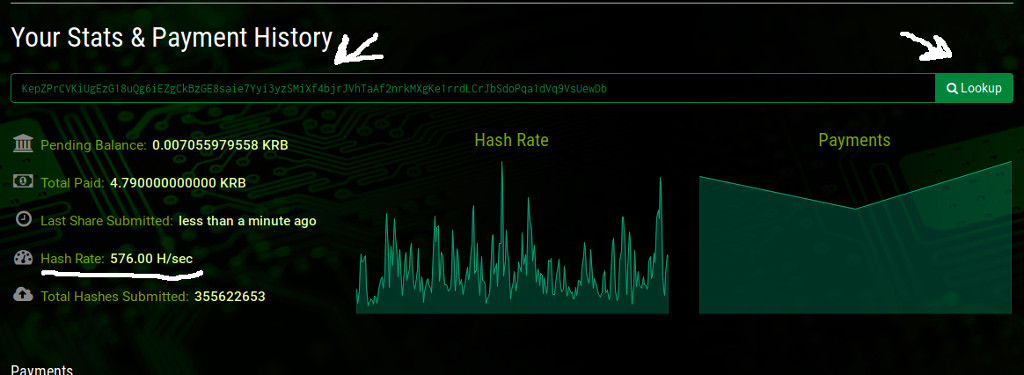
    Checking how the work of the miner on the pool is displayed.

    For this, go to the pool: http://krb.pool.ualinux.com/
    Drop down the page and in the field Your Stats & Payment History enter the address of your wallet. Then click the Lookup button.
    And then in the field Hash Rate: you will see your speed on the pool, as well as paying you.
    All questions and discussions on this topic, please write to our forum here.

  • Майнинг / Добыча "Карбованцев"

    После того как вы установили Кошелек "Карбованець" и у вас появился личный счет, можно приступить к добыче/майнингу "Карбованцев".

    Данная криптовалюта имеет алгоритм CriptoNight, который  оптимизирован для того что бы майнить(использовать компьютер для получения "Карбованцев") не только на GPU/графических процессорах (видеокартах), но и на CPU/обычных процессорах. Это позволяет производить добычу "Карбованцев" при помощи обычного домашнего компьютера без необходимости собирать дорогие мощные фермы.

    Есть несколько вариантов добычи "Карбованцев":
    1. в родном приложении в режиме "майнинг соло" и в режиме "майнинг в пуле";
    2. майнинг в пуле с помощью специализированных программ.

    Специализированные программы для майнинга позволяют задействовать для работы видеокарты, а на обычных процессорах эффективность майнинга может возрастать на 50-100% чем майнинг в родном приложении.

    Посмотреть приблизительные результаты по скорости добычи на различных процессорах и видеокартах можно здесь и здесь.

    При текущей скорости вычислений в сети Карбованца, эффективность майнинга в режиме "соло" стремится к нулю даже если у вас очень мощный компьютер. Поэтому этот вариант мы даже не рассматриваем.

    Рассмотрим "майнинг в пуле".

    Майнинг в пуле означает, что один блок обрабатывается одновременно несколькими компьютерами. При этом при удачной разблокировке одного блока весь выигрыш делится равномерно между участниками. Стоит отметить, что хоть выручка и делится между всеми, но все же такой вид добычи более продуктивный и в итоге приносит больше выгоды.

    1. Майнинг в пуле с помощью родного приложения

    Запускаем Кошелек "Карбованець"  и в меню слева находим пункт «Майнинг».

    Здесь вы сможете выбрать количество ядер центрального процессора, которые будут занятые добычей.
    Следует обратить внимание на выбираемое количество ядер. Минимум не догружайте свой компьютер на одно ядро. Например шестиядерник включайте на майнинг только на 4-5 ядер и т.д. Это предохранит процессор Вашего ноутбука от перегрева.
    Подобрать количество ядер не сложно и вручную. Меняете количество ядер, запускаете майнинг и смотрите на хэшрейт. Чем выше этот показатель, тем лучше. Он показывает, сколько операций в секунду (хэшей в секунду) может делать ваш компьютер.

    Кроме этого, нужно "выбрать пул" (по умолчанию установлен « krb.pool.ualinux.com»). Если у вас установлен не он, то рекомендуем его добавить ("Добаить пул") и установить по умолчанию.


    После этого можно нажимать кнопку «Начать майнинг», в разделе "Майнинг в пуле".

    2. Майнинг в пуле с помощью специализированных программ

    Как и упоминалось выше использование специализированных программ для майнинга позволяет увеличить результативность на 50-200% используя только процессор, а также и задействовать еще и видеокарты, чего не позволяет родной клиент.

    Запускается такой клиент обычно через терминал и результат его работы выглядит приблизительно вот так:


    2.1 Майнинг на CPU (процессорах)

    Для майнинга на процессорах мы рекомендуем программу XMRig.

    файл config.json - пример конфигурации для XMRig
    {
        "algo": "cryptonight",
        "av": 0,
        "background": false,
        "colors": true,
        "cpu-affinity": null,
        "cpu-priority": null,
        "donate-level": 1,
        "log-file": null,
        "max-cpu-usage": 100,
        "print-time": 60,
        "retries": 5,
        "retry-pause": 5,
        "safe": false,
        "syslog": false,
        "threads": null,
        "pools": [
            {
                "url": "krb.pool.ualinux.com:3333", // порт 3333 можно изменить согласно таблице.
                "user": "YOUR_WALLET",           // необходимо поставить ваш номер кошелька
                "pass": "x",
                "keepalive": true,
                "nicehash": false,
                "variant": -1
            }
        ],
        "api": {
            "port": 0,
            "access-token": null,
            "worker-id": null
        }
    }

    2.2 Майнинг на GPU (видеокартах nVidia и AMD)

    Здесь есть два вида программ которые мы вам можем рекомендовать.
    Стоит отметить что программы указанные в п.2.2.1 и 2.2.2, для платформы Windows уже есть в виде готовых исполняемых файлов, а для платформы Linux их необходимо компилировать самому.
    Но эффективность результата на Linux получается выше, за счет того, что вы компилируете программу конкретно под вашу систему.

    2.2.1 Отдельно для каждого вида видеокарт XMRig-nVidia и XMRig-AMD.

    Конфигурационный файл для обоих практически одинаковый

    файл config.json - пример конфигурции для XMRig nVidia/AMD
    {
        "algo": "cryptonight",
        "background": false,
        "colors": true,
        "donate-level": 1,
        "log-file": null,
        "print-time": 60,
        "retries": 5,
        "retry-pause": 5,
        "syslog": false,
        "opencl-platform": 0, // строчку необходимо убрать для карт nVidia
        "threads": null,
        "pools": [
            {
                "url": "krb.pool.ualinux.com:5555", // порт 5555 можно изменить согласно таблице.
                "user": "YOUR_WALLET",           // необходимо поставить ваш номер кошелька
                "pass": "x",
                "keepalive": true,
                "nicehash": false,
                "variant": -1
            }
        ],
        "api": {
            "port": 0,
            "access-token": null,
            "worker-id": null
        }
    }

    2.2.2 Комплексный подход XMR-Stak (процессоры и видеокарты nVidia и AMD задействованы в одной программе).

    Данная программа при первом сама определяет ваши процессоры и видеокарты и путем ответа на не сложные вопросы сама создает свой файл конфигурации для работы.


    С полным перечнем специализированных программ для майнинга вы можете ознакомиться здесь.
    Возможно вам понравится больше другая программа или другая покажет больше производительность на вашем компьютере.

    Для большей эффективности работы программы, необходимо системе разрешить работать с большими страницами в памяти. Это может увеличить производительность на 20-40%.

    big_pages.sh - скрипт для Linux открывающий большие страницы
    #!/bin/bash
    script=`basename "$0"`
    HPS=`grep Hugepagesize /proc/meminfo | awk -F" " {'print $2'}`
    NC=`grep -c processor /proc/cpuinfo`
    NHP=$(($(($NC*2200/$HPS))+1))
    case $@ in
     enable)
      echo $NHP > /proc/sys/vm/nr_hugepages
      ulimit -l $(($NHP * $HPS))
      echo "Huge pages enabled"
      ;;
     disable)
      echo 0 > /proc/sys/vm/nr_hugepages
      echo "Huge pages disabled"
      ;;
     *)
      echo -e "Usage: \n$script enable - Enabling Huge Pages\n$script disable - Disabling Huge Pages"
      ;;
    esac

    Также вы можете скачать этот скрипт для Linux, открывающий большие страницы.

    В MS Windows также существует данная проблема. Выражается она надписью "MEMORY ALLOC FAILED: VirtualAlloc failed." в терминале,  при запуске майнера.
    Даже если этой надписи вы не видите, все равно лучше дать доступ к большим страницам памяти для большей производительности.

    Как открыть большие страницы памятив Windows
    Запускаете из командной строки от имени администратора команду gpedit.msc.
    Далее идете "Конфигурация компьютера" -> "Конфигурация Windows" -> "Параметры безопасности" -> "Локальные политики" -> "Назначение прав пользователя".
    Справа появится список политик. Нам нужна "Блокировка страниц в памяти" - открываете.
    Нажимаете кнопку "Добавить пользователя или группу пользователей" - пишете "Все" без кавычек, затем кнопку "Проверить имена", далее "ОК".
    После этого необходима перезагрузка компьютера.

    Также для тех кто будет добывать валюту на MS Windows, необходимо установить библиотеку Microsoft Visual C++ 2015

    P.S. Рекомендация для тех, кто пробует майнинг в первый раз - проследите, чтобы процессор и видеокарта не перегревались.
    Обычно это значит, что температура не должна превышать 80 градусов.


    Проверка как отображается работа майнера на пуле.

    Для этого, заходите на пул: http://krb.pool.ualinux.com/
    Опускаетесь вниз страницы и в поле Your Stats & Payment History вводите адрес своего кошелька. Далее нажимаете кнопку Lookup.
    И после этого в поле Hash Rate: вы увидите вашу скорость на пуле, а также выплаты вам.

    Все вопросы и обсуждения по этой тематике просьба писать на нашем форуме здесь.